 Edit Master Datasheet Content
This topic describes how to manually edit a content in a master datasheet. You can also edit a master datasheet by importing data from Excel. For more information, see Import Content to a Master Datasheet. To create a master datasheet, see Create a New Master Datasheet.
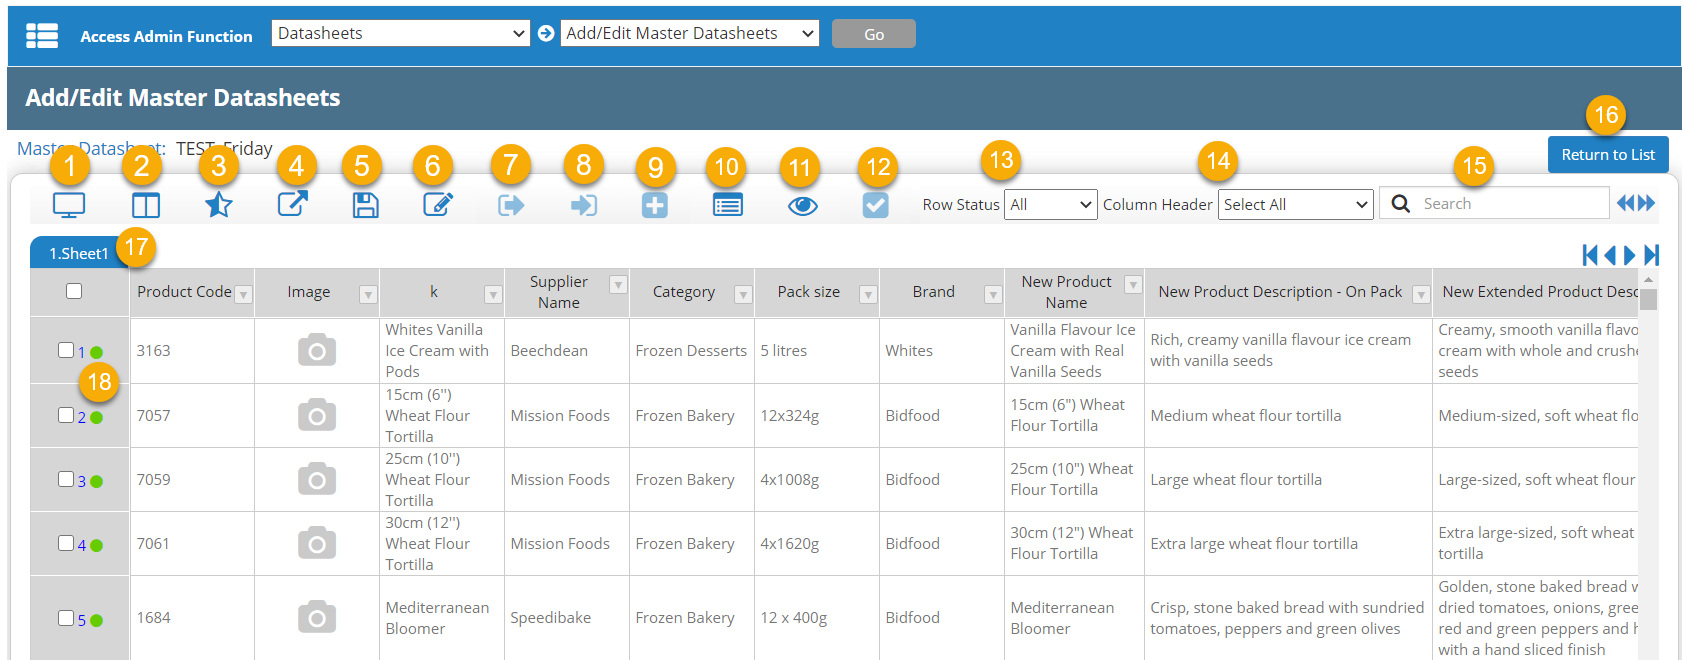
- In Admin
 , from the Access Admin Function primary drop-down list select Datasheets. From the secondary drop-down, select Add/Edit Master Datasheets, and then click Go.
 - Click Edit Content in the row of the master datasheet you want to edit.
Note: The master datasheet must be enabled before you can edit content.
- Click
 Edit.
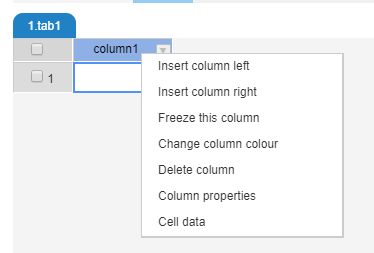
Edit. - For column options, right-click a column header, then click one of the following options:
- Insert column left (see Insert a Column)
- Insert column right (see Insert a Column)
- Freeze this column
- Change column colour
- Delete column
- Column properties (see Edit Column Properties)
- Cell data (edit) (see Edit Cell Data)
- When you are finished, click Save. To leave edit mode without saving your changes, click Edit.
Insert a Column
- On the Add/Edit Master Datasheets page, click Edit.
- Right-click a column header and select Insert column left or Insert column right.
- In the Insert Column dialog box, enter a title for the column.
- For Status, leave the Enabled check box selected to enable the column for use, or clear the check box to disable the column.
- For Force Unique Value, select the check box if you want each cell in the column to have a unique value (for example, a product code or ID number). This cannot be changed after the column has been inserted.
- Do one of the following:
- To create a column as a copy of another column in the master datasheet, select Create Copy from and then select which column to copy.
- To create a new column, click the Select column type drop-down list and select one of the following types:
Note: You can only select the column type during the creation of a column, and you cannot change the type after the column has been inserted.
- Free Text: Allow the user to type in any text or numbers.
- Drop Down / Multi Select Field: Lists of data can be created and named and used with these two types to limit the responses to the data in the list. Multi-select allows for more than one item in the list as a response.
- Image: Allows an image to be included as data in the cell.
- Date: Adds a calendar to select data when the column is edited.
- Project Data: Allow the cell to contain Text, Phrase Text, Drop down list, Date, or Event Date data fields from a Project Data tab. After selecting project data, a second drop-down list is displayed to Select Project Data Field.Note: If you select a project data field that is defined in Smartflow but not in use by the project, the field will always be blank.
- For Column Header, enter or select any keywords for the column as desired. This allows for grouping and filtering when viewing the master datasheet.
- To add Help Text, select the check box and then enter text or upload a file.
- To restrict column editing, select the Enabled check box for Restricted Editing (Assign Role), and then click the Assigned Roles drop-down list and select the roles that are allowed to edit that column's cells. You can assign multiple roles per column to control who can modify specific content.
- Click OK.
Edit Column Properties
- On the Add/Edit Master Datasheets page, click Edit.
- Right-click a column header and select Column properties. The Column Properties dialog box opens.
- To change the column title, change the text in the Edit Column Title field.
- To enable a column for use, for Status, select the Enabled check box.
- To disable a column, for Status, clear the Enabled check box.
- For Column Header, enter or select any keywords for the column as desired. This allows for grouping and filtering when viewing the master datasheet.
- To modify Help Text, select the check box and then enter text or upload a file.
- To restrict column editing, select the Enabled check box for Restricted Editing (Assign Role), and then click the Assigned Roles drop-down list and select the roles that are allowed to edit that column's cells. You can assign multiple roles per column to control who can modify specific content.
- Click OK to apply your edits.
Edit Cell Data
- On the Add/Edit Master Datasheets page, click Edit.
- Select the check box for the row(s) containing the cell(s) the you want to manually edit.
- Click
 Check Out to check out the row.
 - In the Check Out Rows dialog box, select a Status and enter a Reason for Change, then click Confirm.
- Double-click the cell and make edits as necessary.
- When you are finished, click
 Save, then click Save & Continue.
 - Select the check box of the row(s) you have checked out, and then click
 Check In.
 - In the Check In Rows dialog box, select a Status and enter a Reason for Change, then click Confirm.